TL;DR:
- Most app submission issues are predictable and preventable with proper preparation.
- Finalize visuals, assets, and compliance details early to streamline the review process.
- Using tools like AppScreenKit simplifies asset creation, resizing, and adherence to platform requirements.
Submitting your app to the App Store or Google Play feels straightforward until it isn’t. Rejections, missing assets, and confusing policy declarations can stall a launch for days or even weeks. For indie developers and small teams without a dedicated release manager, these delays hit harder because every day in review is a day your app isn’t earning downloads. The good news is that most submission problems are predictable and preventable. This guide walks you through exactly what to prepare, how to submit to both Apple and Google, how to troubleshoot common rejections, and how to build a repeatable process that gets faster every time.
Table of Contents
- What you need before you start
- Step-by-step: Submitting to the Apple App Store
- Step-by-step: Submitting to Google Play
- Troubleshooting, review timelines, and common mistakes
- What most guides miss: Thrifty strategies for indie teams
- Make your next submission faster (and stand out) with AppScreenKit
- Frequently asked questions
Key Takeaways
| Point | Details |
|---|---|
| Prepare assets early | Gather all accounts, compliance docs, and visual assets before starting your submission. |
| Follow platform steps | Work through each store’s workflow precisely to avoid common holdups and rejections. |
| Double-check visuals | Ensure icons, screenshots, and feature graphics meet the right sizes and quality guidelines. |
| Avoid policy pitfalls | Always include required privacy information, demo accounts, and permission declarations to speed up review. |
| Automate for efficiency | Tools like AppScreenKit can cut asset prep time and help indie teams submit like pros. |
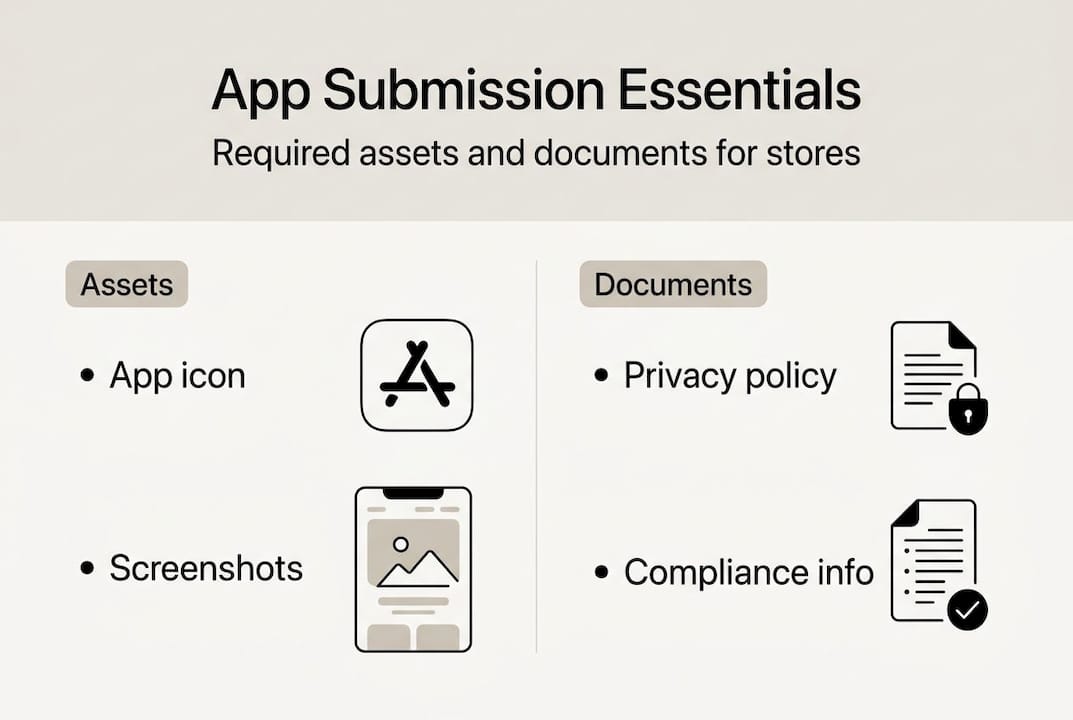
What you need before you start
Before you upload a single build, get your accounts and assets in order. Scrambling for a privacy policy URL or realizing your screenshots are the wrong size after you’ve already filled out metadata is a frustrating, avoidable waste of time.
Accounts you need:
- Apple Developer Program membership ($99/year) and access to App Store Connect
- Google Play Console account ($25 one-time registration fee)
- A privacy policy hosted at a public URL (required by both platforms)
- Demo login credentials if your app has any gated or account-locked features
The app store submission process for Apple requires creating an app record in App Store Connect, uploading a build via Xcode, and completing all metadata including screenshots for every supported device size. Google’s process is similar but has its own quirks. The Google Play launch checklist covers app creation in Play Console, completing app content declarations, setting up your store listing, and uploading an Android App Bundle (AAB).
Here’s a quick comparison of what each platform requires at the visual level:
| Asset | Apple App Store | Google Play |
|---|---|---|
| App icon | 1024×1024 px PNG | 512×512 px PNG |
| Screenshots | Device-specific sizes (6.9", 6.5", 5.5" etc.) | Up to 8 screenshots per device type |
| Feature graphic | Not required | 1024×500 px JPG or PNG |
| Preview video | Optional (up to 30 sec) | Optional |
Beyond visuals, gather your compliance documents early. You’ll need a privacy policy URL, a clear description of what permissions your app requests and why, and any age rating information. Skipping these or filling them in carelessly is one of the top reasons for rejection. Review the app store compliance steps before you begin so nothing catches you off guard. Also confirm your screenshots meet every platform’s app store requirements before upload.
Pro Tip: Start with your screenshots and icon before you write a single line of metadata. Visual assets take the longest to get right, and having them ready prevents the most common last-minute panic.
Step-by-step: Submitting to the Apple App Store
Once your assets are ready, Apple’s submission process follows a clear sequence. Stick to the order below and you’ll avoid the most common sequencing mistakes.
- Create your app record in App Store Connect. Log in, go to My Apps, and click the plus icon to create a new app. Choose your platform, enter your bundle ID (must match your Xcode project), and set your primary language.
- Upload your build via Xcode. Archive your app in Xcode, then use the Organizer to distribute it to App Store Connect. Wait for the build to process (usually 15-30 minutes) before it appears in the TestFlight or submission area.
- Fill in your metadata. This includes your app name, subtitle, description, keywords, support URL, and marketing URL. Keywords are limited to 100 characters, so choose them carefully.
- Upload screenshots for every required device size. Apple requires screenshots for at least one device in each size class you support. The app store listing checklist covers exactly which sizes to prioritize.
- Set pricing, availability, and age rating. Complete the App Privacy section, which asks about data collection practices in detail.
- Add demo login credentials if your app requires an account to access features. Reviewers cannot test gated content without them, and missing credentials is one of the most common rejection triggers.
- Submit for review. Click “Add for Review” and then “Submit to App Review.”
Apple’s submission overview notes that review typically takes 24-48 hours, though complex apps or first-time submissions can take longer. The most common rejection reasons are crashes, incomplete metadata, missing privacy policy details, and screenshots that don’t accurately represent the app.
For screenshots specifically, think of them as your most important marketing real estate. Use clear, benefit-focused captions on each image. Show the most compelling feature first. The app preview images guide explains how to structure visuals that actually convert browsers into downloads.

Pro Tip: Generate screenshots at the largest required size first (6.9" for iPhone), then scale down. Many tools, including AppScreenKit, let you export all sizes in one click, which cuts hours off your prep time.
Step-by-step: Submitting to Google Play
Google Play has its own rhythm, and if you’re a first-time publisher, there’s one requirement that surprises almost everyone: the mandatory closed testing period.
- Create your app in Play Console. Go to All Apps, click Create App, and fill in the basic details including app name, default language, and whether it’s an app or game.
- Complete the app content declarations. This section covers target audience, content rating, data safety, and any sensitive permissions your app uses. Google reviews these carefully.
- Set up your store listing. Add your short description (80 characters max), full description (4,000 characters max), screenshots, feature graphic, and app icon.
- Upload your AAB (Android App Bundle). Go to Production or a testing track, create a new release, and upload your signed AAB file.
- Complete a closed test with real users. New Google Play accounts must run a closed testing period of at least 14 days with a minimum of 20 testers who have opted in. This is non-negotiable for first-time publishers.
- Roll out to production. After your closed test is complete, you can submit for production review.
Here are the exact graphic asset dimensions Google requires:
| Asset | Dimensions | Format |
|---|---|---|
| App icon | 512×512 px | 32-bit PNG |
| Feature graphic | 1024×500 px | JPG or 24-bit PNG |
| Phone screenshots | 320-3840 px (any side) | JPG or PNG |
| Tablet screenshots | Same range, tablet ratio | JPG or PNG |
Your privacy policy URL is mandatory. Without it, you cannot publish. For design guidance on making your Play listing visually competitive, the Google Play visual design guide walks through what works in 2026.
Pro Tip: Build your closed tester list before you submit your app. Collect 20+ opt-in email addresses from colleagues, beta users, or community members in advance so the 14-day clock starts immediately after upload.
Troubleshooting, review timelines, and common mistakes
Submission sent. Now what? Understanding what reviewers look for, and where most apps stumble, saves you from frustrating back-and-forth cycles.
Most common rejection reasons:
- Incomplete or inaccurate metadata (descriptions that don’t match the app’s actual behavior)
- App crashes during review (always test on a clean device before submitting)
- Missing or incorrect privacy policy
- Screenshots that are misleading or don’t represent the current version
- Undeclared permissions or missing demo login credentials
- Policy violations around content, data collection, or in-app purchases
Critical warning: Always provide working demo credentials for any account-gated features. Reviewers will not create their own accounts to test your app. Missing credentials almost guarantees rejection on the Apple side.
Here’s how Apple and Google compare on the review process:
| Factor | Apple App Store | Google Play |
|---|---|---|
| Typical review time | 24-48 hours | 1-7 days |
| First upload requirement | None extra | 14-day closed test |
| Primary focus | Guideline compliance and safety | Testing tracks and declarations |
| Rejection appeal process | Resolution Center in App Store Connect | Policy appeal form in Play Console |
| Common pain points | Metadata accuracy, demo credentials | Content declarations, closed test setup |
Both platforms reject misleading metadata and inaccurate screenshots. Apple leans harder on guideline compliance and safety checks. Google focuses more on the policy declaration process and testing track completion. Knowing this helps you prioritize where to double-check your work.
If you get rejected, read the rejection message carefully. Most include specific guideline references. Fix only what’s flagged, resubmit, and don’t change unrelated metadata at the same time (it can trigger a longer re-review). For ongoing improvement, the guides on improving app listing quality and app store branding tips are worth bookmarking.
What most guides miss: Thrifty strategies for indie teams
Most submission guides treat the process as a one-time checklist. That’s the wrong mental model. The teams that breeze through submissions treat it as a repeatable system they refine over time.
Here’s the counterintuitive part: solo developers and small teams often get stuck not because they don’t understand the guidelines, but because they try to do everything in parallel. They’re tweaking code while also writing metadata and manually resizing screenshots at 2 a.m. the night before launch. That’s where mistakes happen.
The smarter approach is to finalize your store visuals early, before your last development sprint. Screenshots and feature graphics should be locked in while you’re still polishing the app. This forces you to think about your value proposition clearly, which often improves the app itself.
Using screenshot template time-savers means you’re not starting from scratch every launch. Pre-built templates with correct dimensions eliminate an entire category of rejection risk. Pair that with a policy checklist you reuse for every submission, and you’ve built a real process instead of a panic.
Make your next submission faster (and stand out) with AppScreenKit
If there’s one place where indie teams consistently lose hours, it’s creating and resizing screenshots for every required device size. Getting dimensions wrong is one of the easiest ways to trigger a rejection or delay.
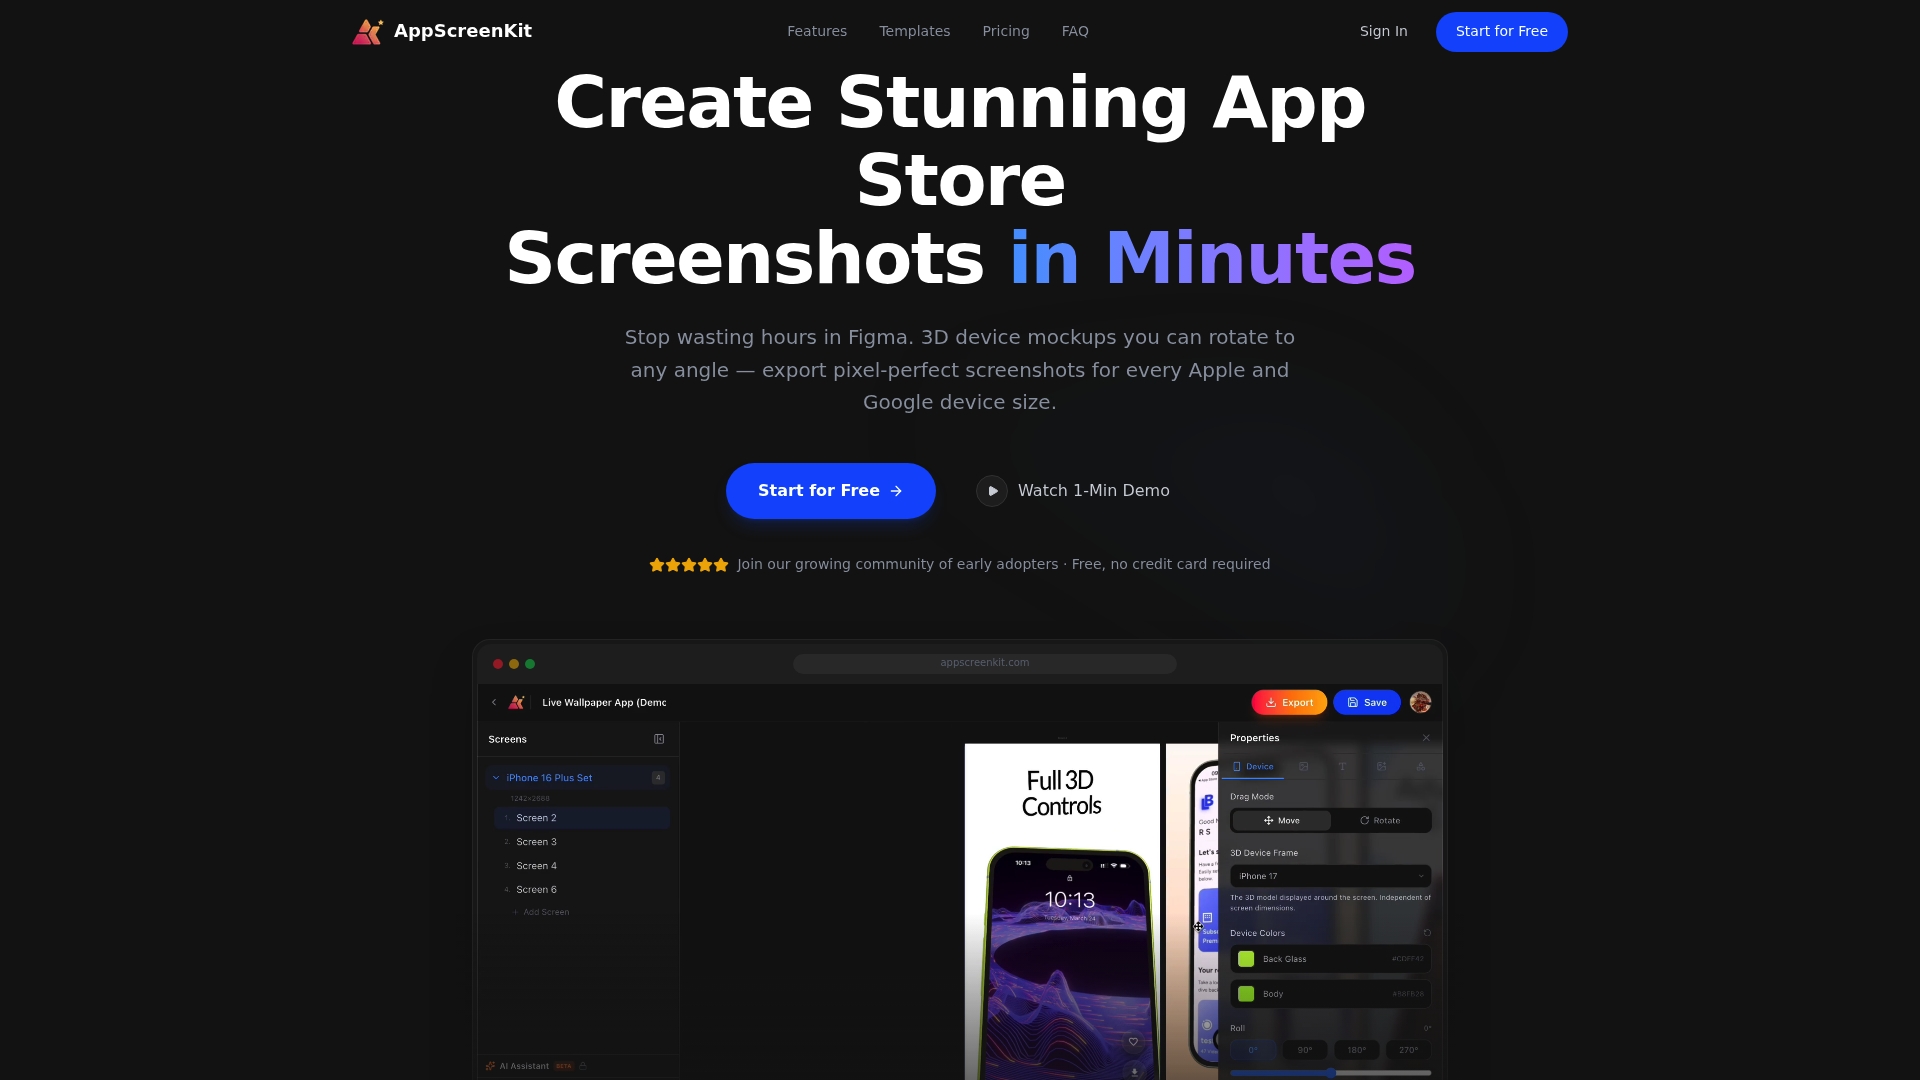
AppScreenKit is built specifically for this bottleneck. Upload your app screens, customize them with 3D device mockups, add branded text and gradient backgrounds, and export every required size in one click. No Figma skills needed. You can also stay current with 2026 app store visual trends and review the full visual submission requirements to make sure every asset is store-ready before you even open App Store Connect or Play Console.
Frequently asked questions
How long does app store review take for Apple and Google?
Apple review typically takes 24-48 hours, while Google Play can take 1-7 days. First-time Google Play publishers also need to complete a 14-day closed test before production rollout.
What are the common reasons for app rejection?
The most frequent causes are incomplete metadata, app crashes during review, policy violations, missing privacy policies, and misleading screenshots. Rejections from incomplete metadata are especially common and easy to prevent with a pre-submission checklist.
What visuals are required for app store submission?
Apple and Google each require specific screenshot dimensions and a correctly sized app icon. Google Play additionally requires a 1024×500 feature graphic and accepts up to 8 screenshots per device type.
How can I speed up submission for a first-time app?
Prepare all assets before you open the submission form, follow guidelines precisely, and use a screenshot generator to avoid formatting errors. Both platforms emphasize guideline compliance and accurate assets as the fastest path to approval.
Recommended
- App store compliance: Essential steps for approval and quality – AppScreenKit
- App store requirements: submission rules and visuals that convert – AppScreenKit
- App store listing quality: boost discoverability and downloads – AppScreenKit
- Effective app store branding steps for higher conversions – AppScreenKit
Leave a Reply